Introduction
Low-cost (US$19) Air Quality Monitoring System


Purpose
The aim of this project is to use PMS7003 sensor without 3rd party library. Additionally, it allows delay function in the loop and demonstrates how to communicate with sensor via software serial.
- delay function : Some example codes on Internet do not work with delay in loop and generate endless checksum error. That is caused by serial buffer overflow between PMS7003 and Wemos. To avoid the issue, this project incorporates preamble searching mechanism to locate exact data stream in the serial buffer. Therefore, we are able to use various value in delay function without checksum error.
Features
- delay function : Some example codes on Internet do not work with delay in loop and generate endless checksum error. That is caused by serial buffer overflow between PMS7003 and Wemos. To avoid the issue, this project incorporates preamble searching mechanism to locate exact data stream in the serial buffer. Therefore, we are able to use various value in delay function without checksum error.
Prerequisites
- ESP8266 package for Arduino IDE
Hardware
-Wemos D1 mini : US$1.77 on Aliexpress
-PMS7003 air quality sensor : US$16.80 on Aliexpress
Step 1. Setup hardware
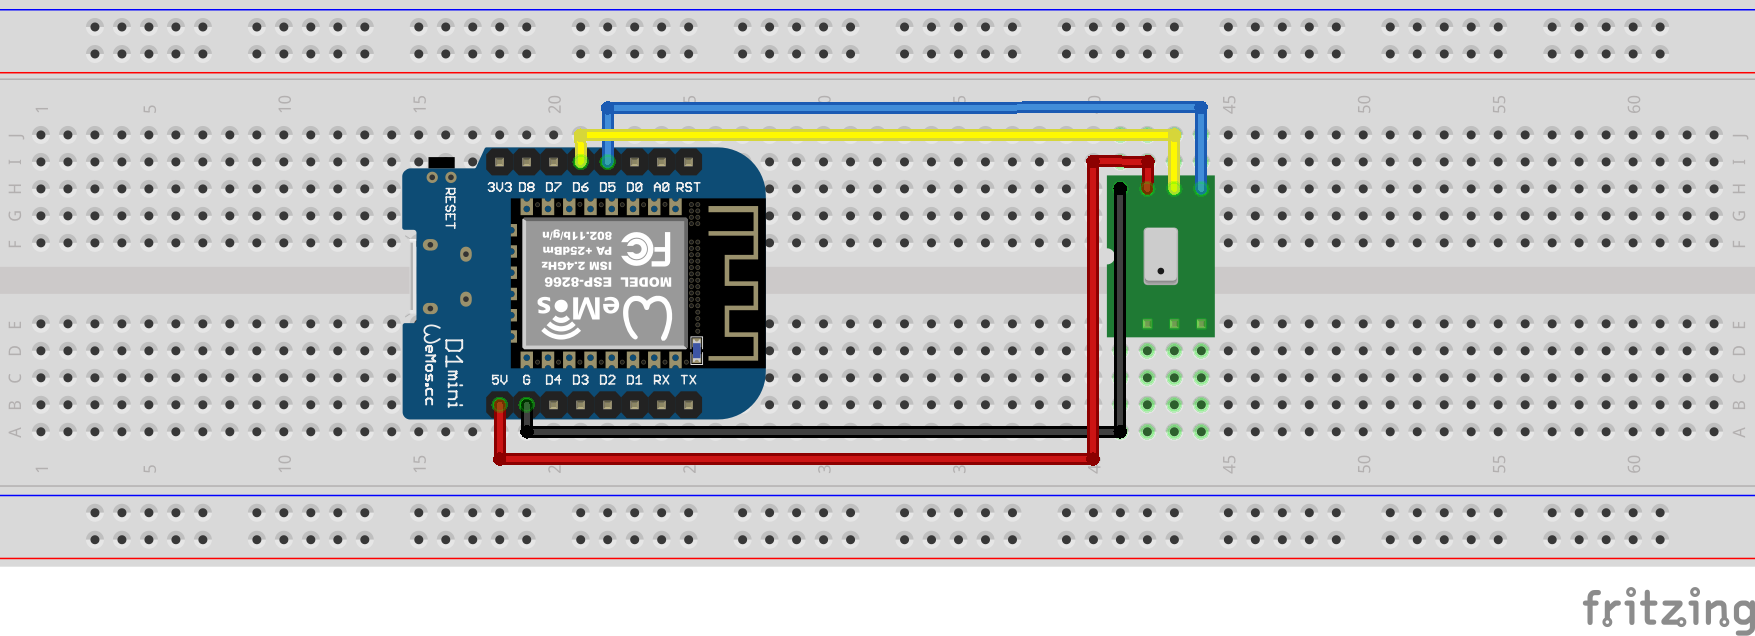
PMS7003 sensor comes with a small breakout board, which has TX, RX, VCC, GND pins. Connect TX of PMS7003 to D5 of Wemos, RX to D6, VCC to 5V, and GND to G. Finally, connect micro usb to Wemos for uploading firmware, and check serial monitor and serial plotter in Android IDE to make sure the sensor works correctly.
Step 2. Upload sketch to Wemos D1 mini
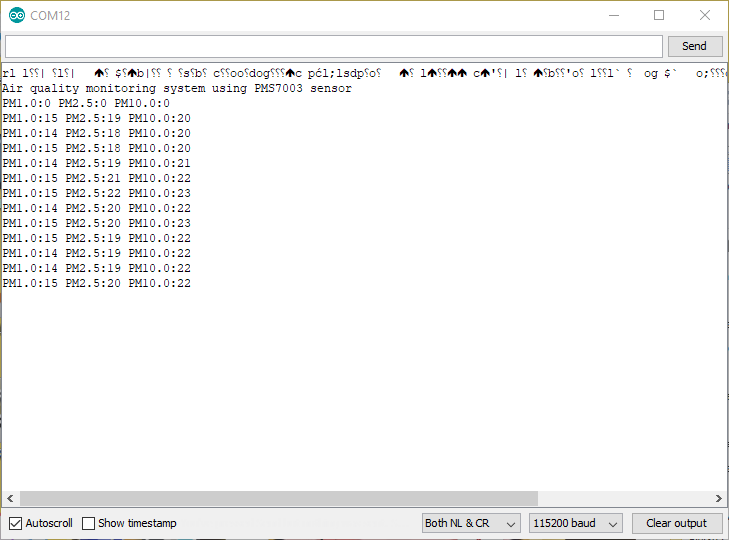
After uploading firmware, Wemos restarts itself automatically. Once Wemos D1 mini has restarted, serial monitor shows air quality data from PMS7003 every 2 seconds. On the output, each line consists of PM1.0, PM2.5, and PM10 measurement. For example, the last line of the output says PM1.0 is 15 μg/m³, PM2.5 is 20 μg/m³, and PM10.0 is 22 μg/m³.
Using serial plotter of Arduino IDE we can see a graph of these three values in a single plot. In the graph, Green line represents PM1.0, Red line represents PM2.5, and Green line represents PM10.0.

- IoT Laboratory: ESP8266-based WiFi air quality monitoring system using PMS7003 sensor
- IoT Laboratory: ESP8266-based WiFi MQTT air quality monitoring system using PMS7003 sensor
Source codes at github
Requirements
-Wemos D1 mini : US$1.77 on Aliexpress
-PMS7003 air quality sensor : US$16.80 on Aliexpress
Instructions
PMS7003 sensor comes with a small breakout board, which has TX, RX, VCC, GND pins. Connect TX of PMS7003 to D5 of Wemos, RX to D6, VCC to 5V, and GND to G. Finally, connect micro usb to Wemos for uploading firmware, and check serial monitor and serial plotter in Android IDE to make sure the sensor works correctly.
Step 2. Upload sketch to Wemos D1 mini
Results
Using serial plotter of Arduino IDE we can see a graph of these three values in a single plot. In the graph, Green line represents PM1.0, Red line represents PM2.5, and Green line represents PM10.0.
References
- IoT Laboratory: ESP8266-based WiFi air quality monitoring system using PMS7003 sensor
- IoT Laboratory: ESP8266-based WiFi MQTT air quality monitoring system using PMS7003 sensor
- PMS7003 sensor : http://www.plantower.com/en/content/?110.html
No comments:
Post a Comment